Purpose
Federated identity with Practice Protect offers the best overall end user SSO experience in the Microsoft cloud and offers unique security options not available in standard deployments. Once Federation & Provisioning is in place all Office 365 Identities will be managed from Practice Protect and login at the Office 365 website is no longer possible.
Similar to pass-through authentication, user logon attempts are passed back to the Practice Protect farm to validate logins against your custom polices. Outlook/Skype For Business 2013 or later will leverage modern authentication to communicate with Practice Protect. Web browsers will get redirected to the Practice Project to complete their authentication. This lets us use what’s called SmartLinks technology to allow users to logon directly to SharePoint and other Office 365 Apps without entering a username or password.
We also have access to security features not available in other scenarios. We can enable client access filtering which lets us restrict access to Microsoft cloud services based on IP address (commonly used when we have hourly employees that shouldn’t be able to check email from home). We also provide multi-factor authentication.
Prerequisites
- Administrator Access to your Office 365 Account (Needed to Create Service Account – i.e. practiceprotect@emaildomain.onmicrosoft.com) You can follow the following guide Create Practice Protect Service Account.
- Office365 Cloud Users (Non-Active Directory Sync with Office 365)
- Active Practice Protect User Account. (Once federated, O365 users should use Practice Protect Account as their login)
- User login in Practice Protect must matched with their Office365 accounts.
Instructions
-
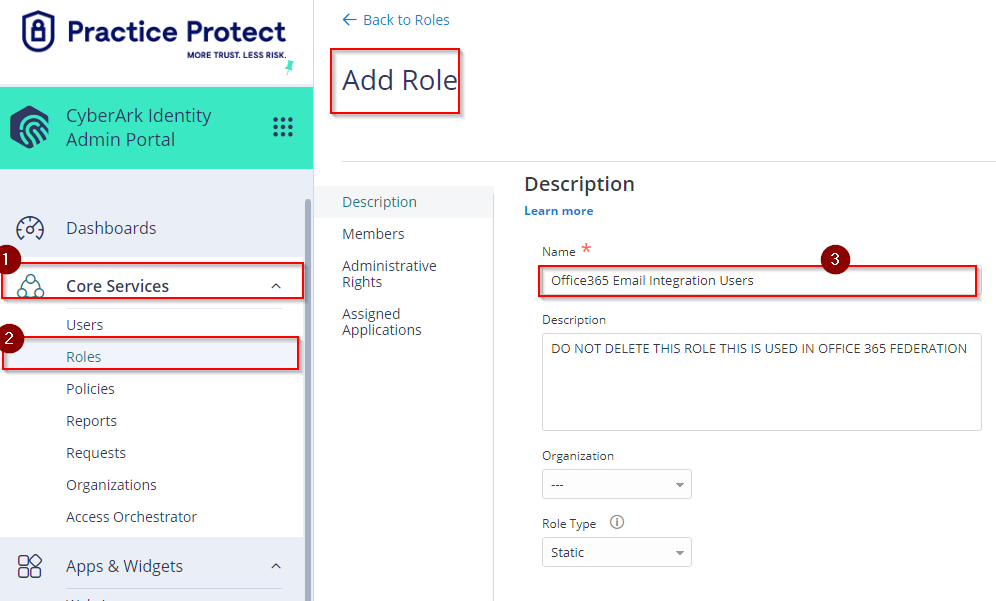
- Under Core Services Click on Roles –> Click on Add Role –> Type Office 365 Email Integration Users on the Name field, then Click Save.

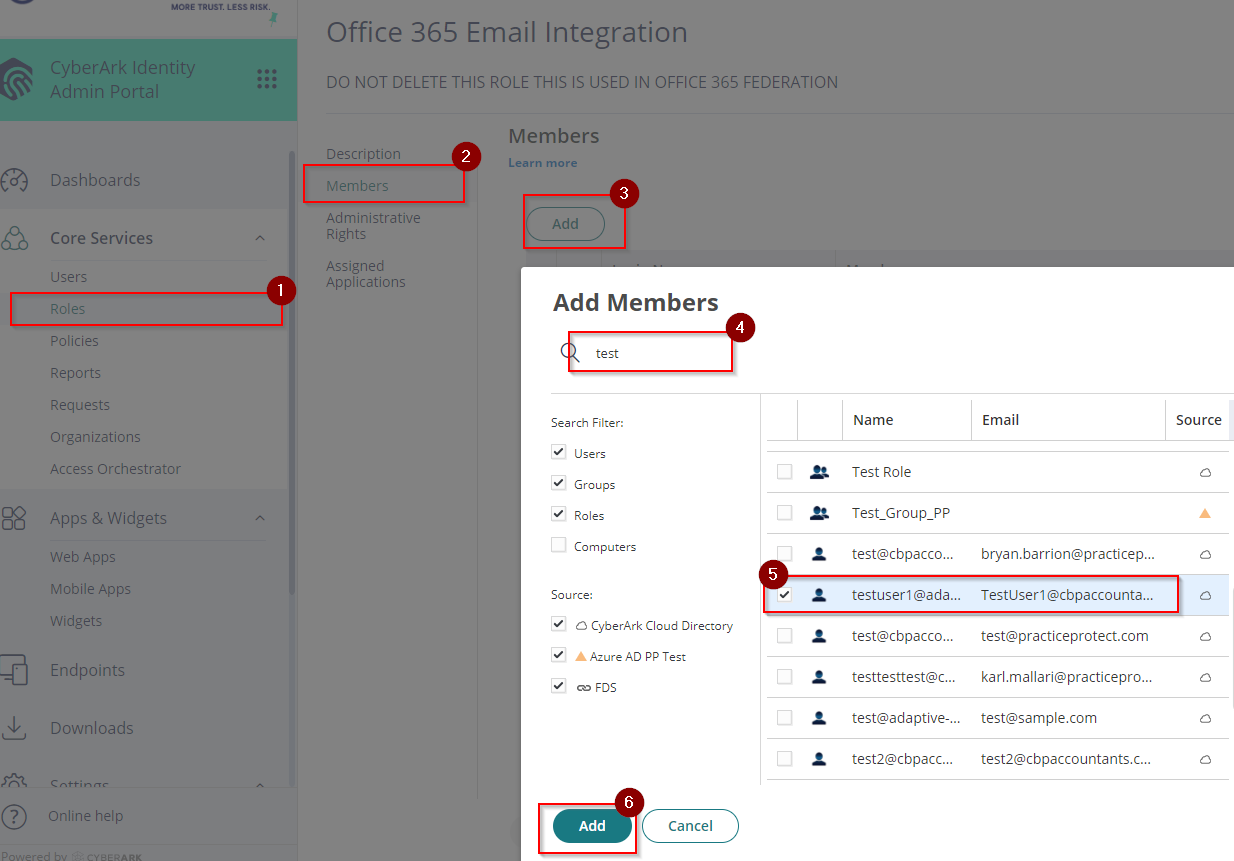
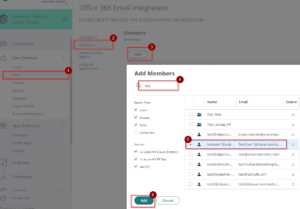
- Newly created Role (Office 365 Email Integration Users) should now show up on the list. Click on Office 365 Email Integration Users role –> Click Members –> Click Add –> On the search field type the Name of the user(s) –> Tick the box on the side of the Name then Click Add –> Click Save (You need to add all user accounts that have an active and matched accounts in Practice Protect and Office 365 to the Role).
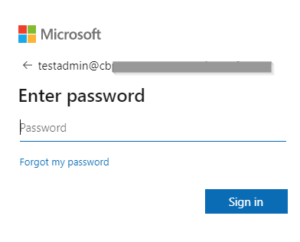
- Login to Office365 portal using the Office365 Service Account (Global Admin). Enter the Username and Password then Click Sign in. If you have not setup the Service Account follow the following guide.
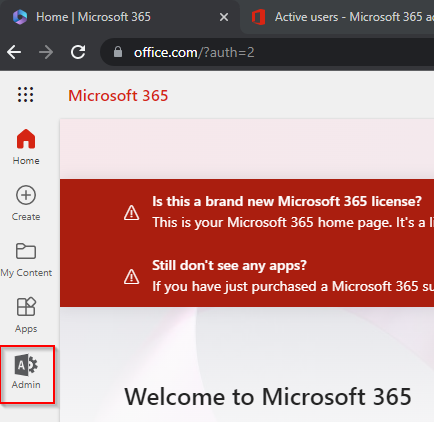
- Click on Admin to go to the Admin Center.
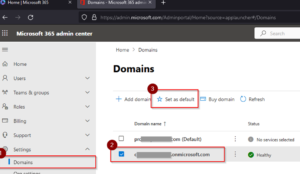
- On the Admin center, Click on Setup –> Click Domains –> On the Domain name select the Domain with .onmicrosoft.com then Click Set as default.
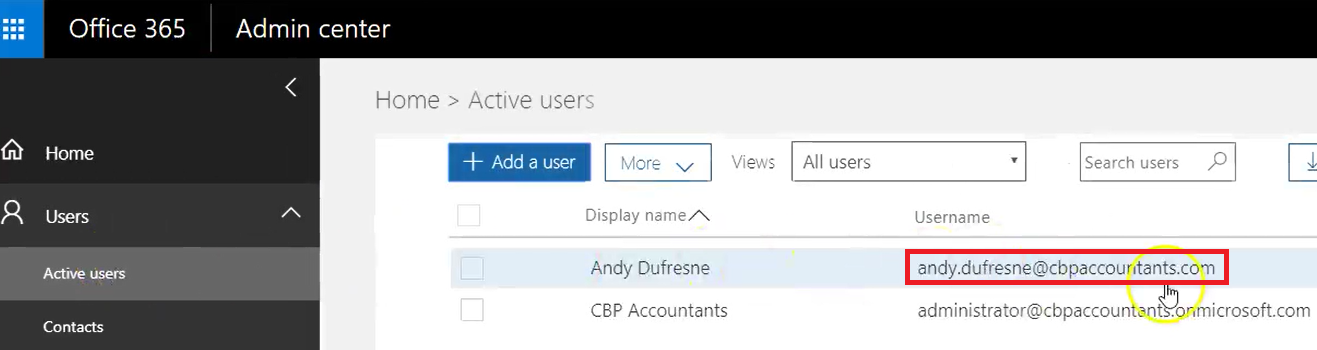
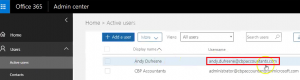
- Go to Users –> Click on Active users –> Notice that the Username is using the correct domain (without .onmicrosoft.com). We need to use the correct domain especially for New User Creation as this will sync up with O365. For existing users in O365 the username to be created should be exactly the same with the one in O365, otherwise it would create a separate account upon first synchronization.
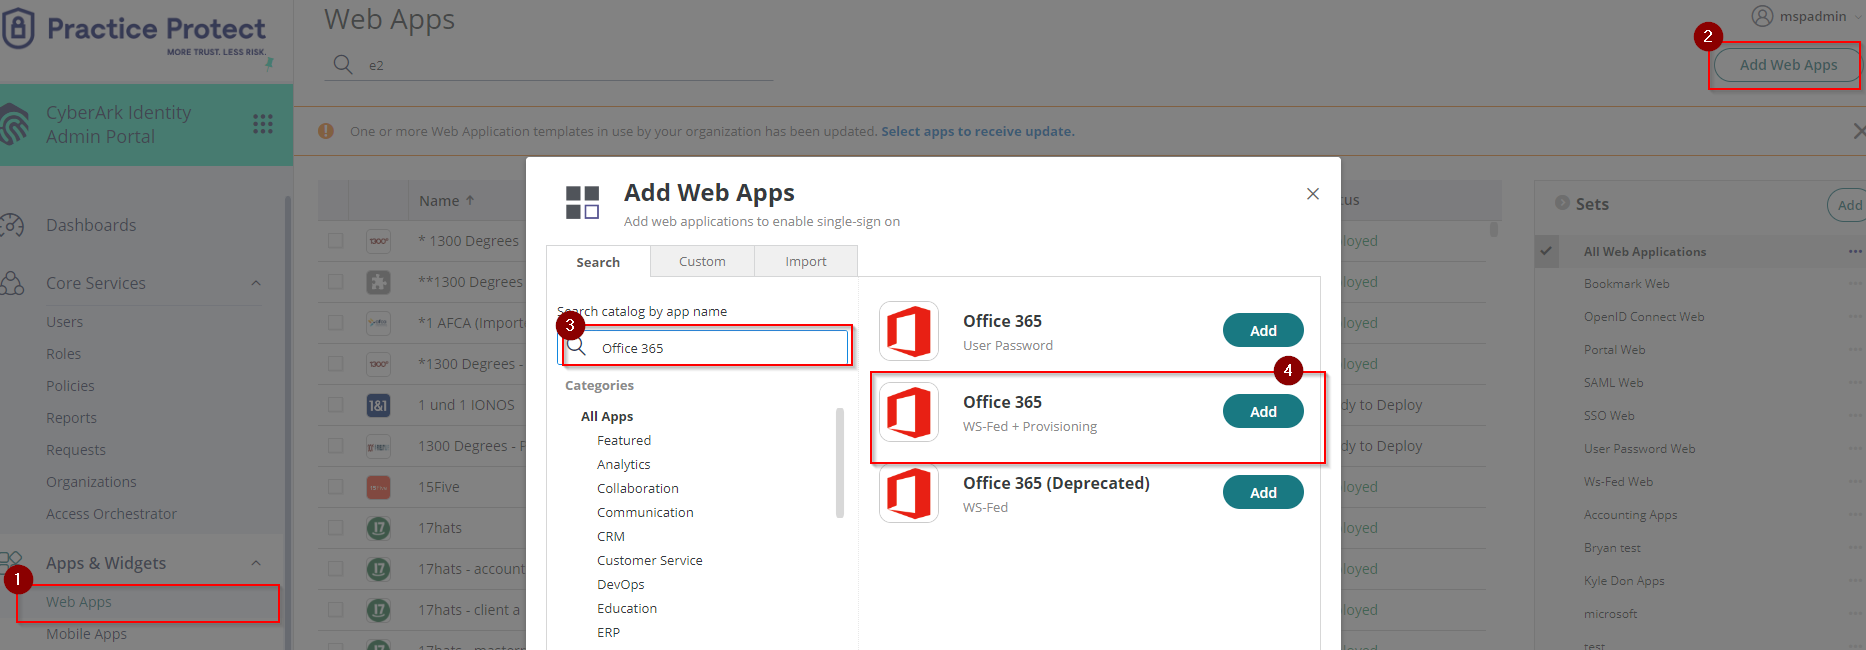
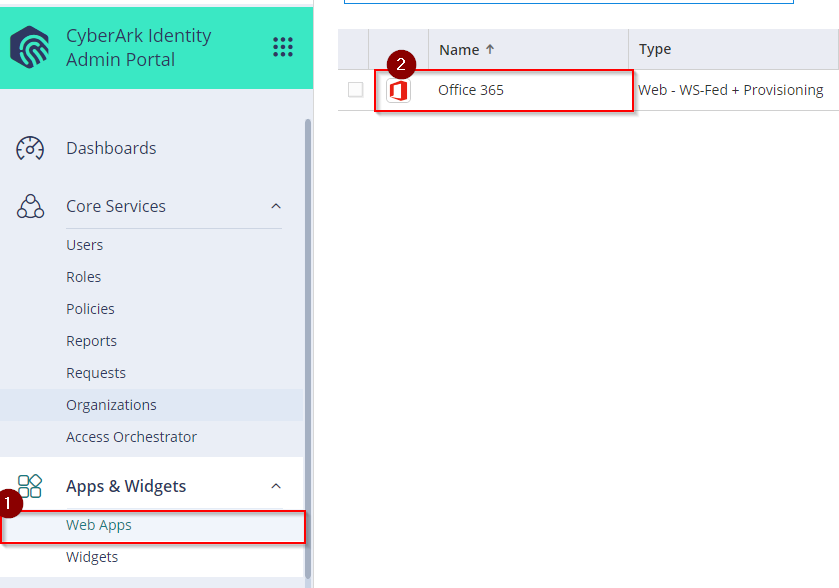
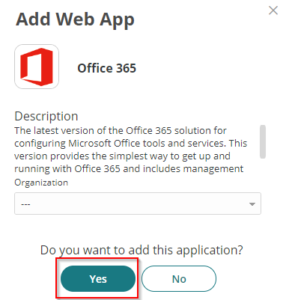
- Go back to the Client’s Practice Protect Admin Portal. Click on Apps –> Add WebApps –> Type Office 365 on the search field –> Select Office 365 (WS-Fed +Provisioning) –> Click Add

- On Add Web App page, click Yes.
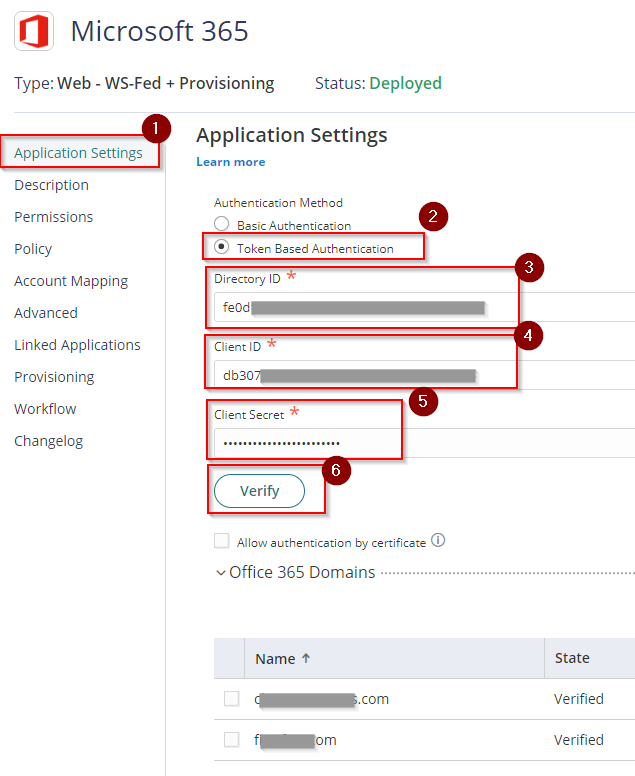
- On the Application Settings, select Token Based Authentication then enter the Directory ID, Client ID and Client Secret that was registered in AzureAD.

- Click Verify.
- Under the Advanced settings, paste the script below after line 76. Then Save. This configuration sets the Issuer URI/URN for the SAML token response and identifies the domain that the token is associated with.
var UserMail = LoginUser.Get('userprincipalname');

var URN = UserMail.split("@")[1];

setAttribute('IssuerName', 'URN:' + URN);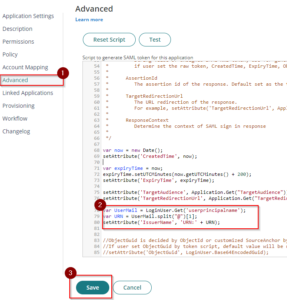
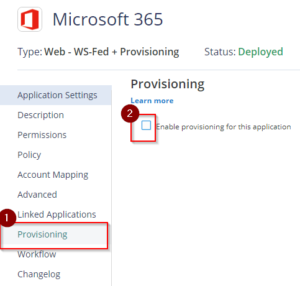
- Click on Provisioning. Then, tick the box on the side of Enable provisioning for this application.
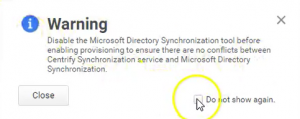
- On the Warning page tick the box Do not show again then click Close.
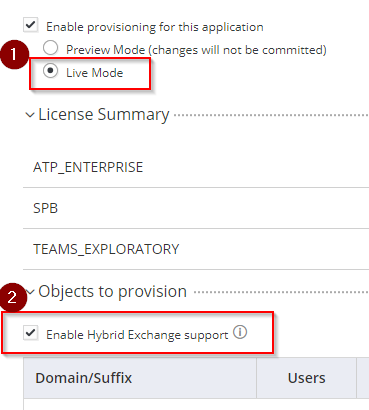
- Leave Live Mode selected and tick Enable Hybrid Exchange Support. This means that any changes (on the user details) will be reflected in Office 365.
- Scroll down and go to Sync Options: select the radio button Sync (overwrite) users to target application when existing users are found with the same principal name. Leave the option Do not de-provision (deactivate or delete) users in target application when the users are removed from mapped role.
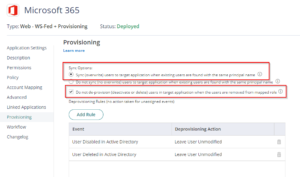
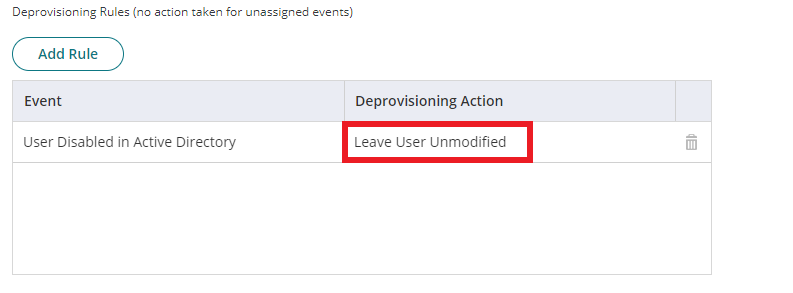
- Under Deprovisioning Rules, for “User Disabled in Active Directory” change Deprovisioning Action to “Leave User Unmodified”. This rule will apply for both In-Cloud users and Active Directory users (if used).
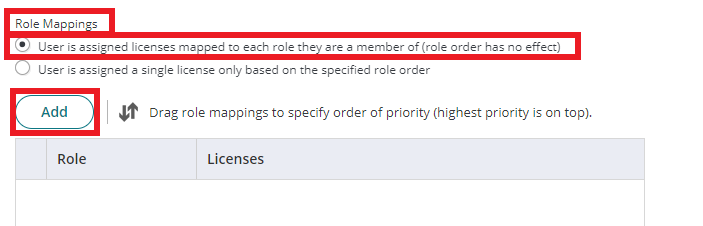
- Scroll down and go to Role Mappings, Select the radio button User is assigned licenses mapped to each role they are a member of (role order has no effect). Click Add.
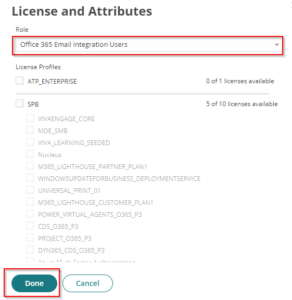
- On the License and Attributes page, Select Office 365 Email Integration Users for the Role created in Step 2. Don’t assign any licenses and click Done.
 Optional – If you would like to sync licensing you can follow the following guide.
 - Click Save.
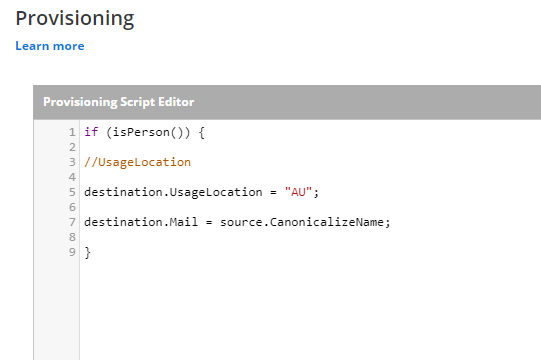
- Scroll down to Provisioning Script and expand. Replace the existing script with the below Script.
if (isPerson()) {

//country based location e.g. "US" or "AU"

destination.UsageLocation = "AU";

destination.Mail = source.CanonicalizeName;

}
-
Then click Save to apply the script.
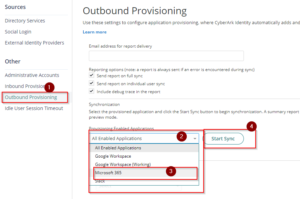
- Run a manual synchronization. Go to Provisioning Enabled Application –> Select the Office 365 or Microsoft 365 (depending on the name of the app added), then click on Start Sync.
- View the real time status of synchronization by clicking on View Synchronization Job Status and Reports. Once the Synchronization is successful and completed for all users, any changes in Practice Protect will reflect in Office 365.
- Enable ADAL/Modern Authentication in Office 365 through this page – This is to apply Practice Protect security mechanism in terms of signing in (Geolock, MFA, and other policies) as Basic Authentication doesn’t prompt for Multi-Factor Authentication
- This completes the backend configuration of Office 365 Federation with provisioning in Practice Protect.
- Under Core Services Click on Roles –> Click on Add Role –> Type Office 365 Email Integration Users on the Name field, then Click Save.
-
Enabling Office365 Email Integration/Federation
1. Return to the Office365 tile in the Admin Portal.

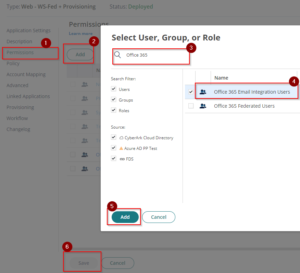
2. On Permissions, Add the role which contains the user for email integration (i.e. Office 365 Email Integration Users) and click Save to apply. This should display the app on their user portal and can be used once federated.
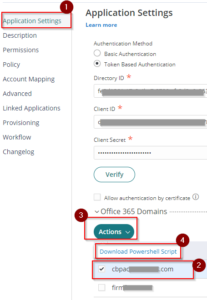
3. Return to the Application Settings and then on Office 365 Domains section, tick the box beside the Domain(s) Name (i.e. youremaildomain.com) –> Click Actions –> Select Download Powershell Script and save the downloaded file as it will be used in the following steps to federate.
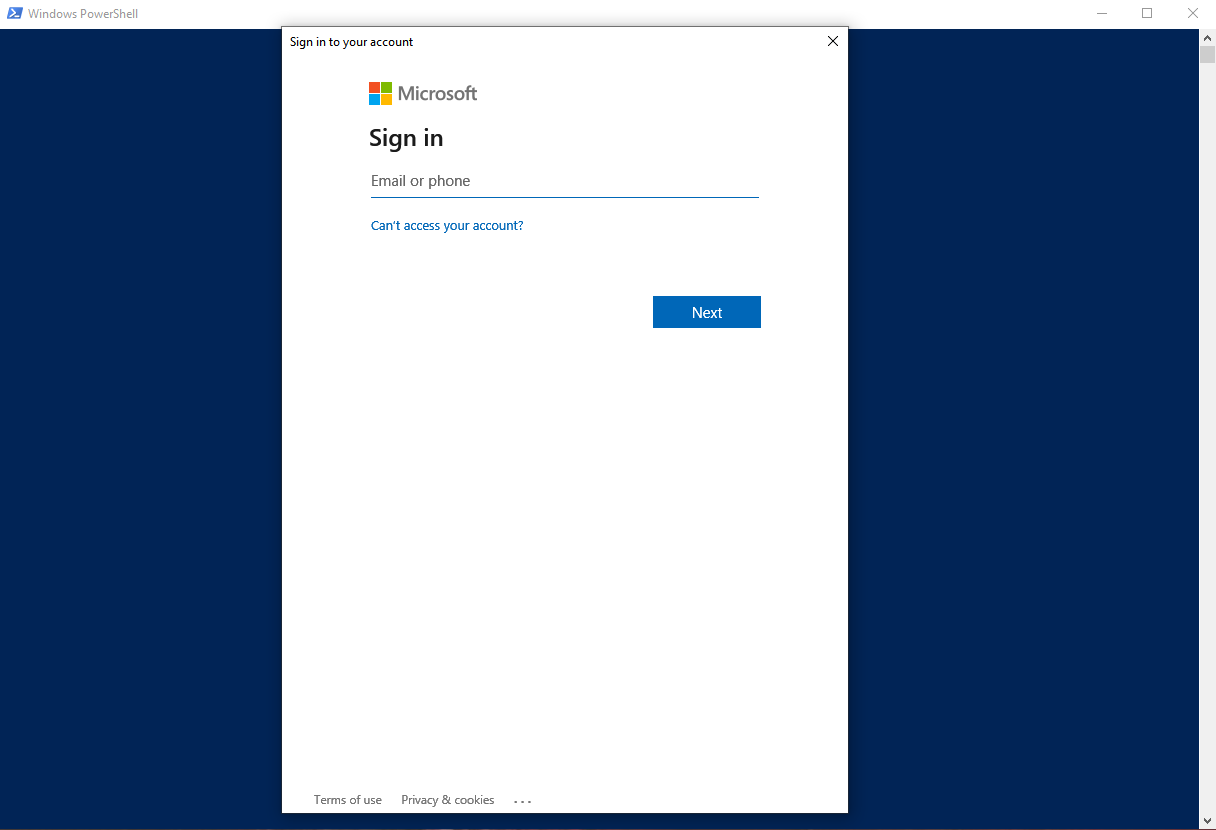
4. Go to the downloaded file from Step 3 and Right Click –> click Run with PowerShell. This will prompt to login and authenticate. Use the Office365 Admin Account.

5. With the prompt “What Action Would You Like To Do?” press F. The script will run and federate your domain.

6. Once the script is completed, Go back to Office365 web app settings in Practice Protect. On the Office 365 Domains section check the Type of the domain (i.e. cbpaccountant.com) , It should now be Federated. (Optional) Refresh the page to show latest state and type.

7. (Optional) Repeat step 3 to 6 to federate other domains.
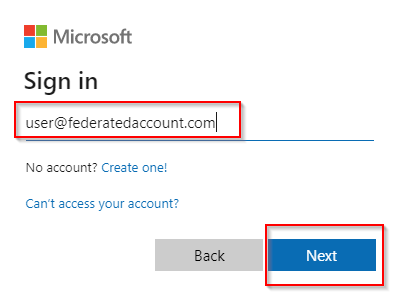
8. Test federation if it is working by signing in to a user account in Office 365, Once you type the user name/email address the page will redirect to Practice Protect.

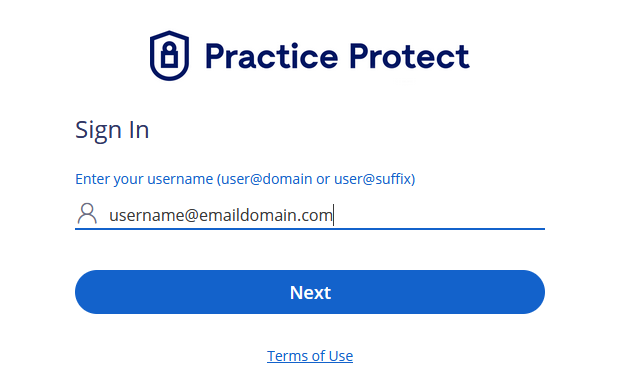
9. To authenticate and access, login using an active Practice Protect account credentials.

10. If you have your Office 365 Email configured on Outlook Desktop or Mobile, you will be prompted to login with your Practice Protect Account. Most likely if it is not in synced.
11. Post Federation, Practice Protect recommends disabling of legacy protocols/basic authentication (i.e. POP. IMAP, AUTH SMTP) in Office365. Please see following guide.